Friday, July 28, 2017

SSInk - Anything But a Card

Today at Stylin' Stampin' Inkspiration we are sharing ideas that are anything, but a card.  It is fun to think out side of the card making box once in a while, and make something different.   

Here's what I made:

I made these cute little bags with the designer series paper from the Coffee Break product suite.  I was more excited about this suite than any other when I first saw the new catalog.  I mean, really - I love coffee, and my husband and I had our first date at Starbucks.  This suite was meant for me.  LOL.  

I got the idea from a post I found on Crafty Caroline Creates, and thankfully she shared dimensions and scoring directions at the end.  I used the new Pretty Label punch to close up the top, and decorated the punch with a heart from the new Corrugated Elements.  I used the Crumb Cake ribbon from the suite to add a bow over my stamped greeting.

These were little thank you treats for the gals that attended my class last month.  If you are interested in attending, the next product based class is on August 20th and actually comes with the Coffee Cafe stamp set.

Be sure to head on over to the Stylin' Stampin' Inkspiration blog to see what fun items the other design team members have made!

Monday, July 24, 2017

SSINK - Case the Catalog

Hello everyone!  How's it going?  We had a great weekend.  My son came home after being gone for two weeks.  Yesterday, we were able to take the kids into Seattle to see DanTDM at the Paramount theater.  Dan is their favorite YouTuber, and they were so excited when the second leg of the tour was announced, and there was a Seattle stop.


Today with Stylin' Stampin' Inkspiration we are all CASE-ing projects from the annual catalog.  The Stampin' Up! catalog is an amazing resource for ideas.  I chose to share a project I found on page 157, that features the new Lovely Inside & Out Bundle.  I loved that this was a quick and easy card.

Here is my card:

I started with a Calypso Coral card base, that I stamped the edges of using the rain looking stamp, and Calypso Coral ink.  Then on my Whisper White layer, I stamped the round "flower" image in Flirty Flamingo, and Calypso Coral.  I used the rectangle "leaf" stamp in Pear Pizazz.  On the top, I inked the stamp, stamped it once, and then moved it a little and stamped it again.  That gave me the fun two toned look for my leaves.  I used the Lovely Words Thinlits, Sweet & Sassy Framelits, and some Gold Foil paper for the greeting.  The card was accented by three simple White Perfect Accents.

Head on over to the Stylin' Stampin' Inkspiration blog to see what the other Design Team members have CASE'd.

Thanks for stopping by! Have a great day!
~Nichole

Friday, July 21, 2017

Favorite Punch - Pretty Label Punch

Hello everyone!  I hope you have had a good week!  I am super excited for the weekend, because tomorrow my son comes home.  He has been gone for two weeks, and this Momma has been missing him like crazy!  But, I am also so happy that he gets to have these adventures.

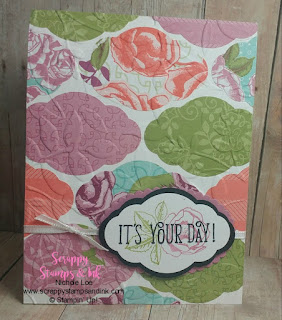
Today over at Stylin' Stampin' Inkspiration we are showing of the fabulous punches that Stampin' Up! has to offer.  I chose to showcase the Pretty Label Punch.

Here is my card:


I punched out 13 pretty labels from the Petal Garden Designer Series Paper and used them to create a background on my Thick Whisper White card base.  Once I had all of the punches glued down, I ran the base through the Big Shot to emboss it with the new Layered Leaves 3D Dynamic Embossing Folder.  For my greeting I used the small rose stamp from the Graceful Garden stamp set, and inked it up with the Sweet Sugar Plum and Old Olive markers.  I stamped the image off once on my grid paper, and then onto my Whisper White card stock.  The words are from the Happy Birthday Gorgeous stamp set, inked up in Basic Black Archival ink.  I punched out the greeting with the Pretty Label punch.  I wanted my greeting to stand out, so I made a Basic Black border for my greeting.  I punched out two Pretty Labels with Basic Black cardstock.  I cut one in half horizontally, and cut the other in half vertically.  I decided how much I wanted the black to stick out, and glue the pieces down.  When I make mats like this, I'll glue both horizontal (or vertical) down first, and then glue both pieces from the other cut down.  I popped my greeting piece up with some Stampin' Dimensionals, over the 1/8" Sheer Ribbon in Whisper White.

Thanks so much for stopping by!  Be sure to head on over to the Stylin' Stampin' Inkspiration blog to see what the other Design Team members are doing with their punches.
I hope you have a great weekend!
~Nichole

Monday, July 17, 2017

#SSINKTC47

Hello everyone!  I hope you had a wonderful weekend!  I spent most of the weekend just relaxing with my husband.  It was such a nice change from our usually jam packed schedule!

Today, at Stylin' Stampin' Inkspiration we have a Technique Challenge starting.

I was a little apprehensive about, and intimidated by this technique to start with.  But I am so glad I tried it out!  It is fun, and also an easy way to make up a whole set of coordinating cards!

Here is my card:

I used the Pear Pizazz, Rose Red, Calypso Coral, and Crushed Curry reinkers with the Ink Spray & Smash technique to create my background.  I then stamped images from the Paisleys & Posies stamp set over the background, using Archival Basic Black ink.  I dressed it up with some Pear Pizazz shimmer ribbon, and Black Mini Sequins, and a Happy Birthday greeting from the Happy Birthday Gorgeous stamp set.

I hope you will head over to the Stylin' Stampin' Inkspiration blog and see what the other design team members did with this technique, and maybe even play along with the challenge yourself!

Thanks so much for stopping by!
~Nichole

Friday, July 14, 2017

Favorite Product Suite: Coffee Break

Hey there!  How has your week been?  My week has been good, but a little different.  My son is out of town on a chuch mission trip, so this week I've just been hanging out with my daughter all week.  He will be home for about 12 hours Sunday evening, and then Monday morning he heads off to Boy Scout summer camp, and will be gone another week.

Today at Stylin' Stampin' Inkspiration we are sharing projects made with our favorite product suite.  By far, my favorite product suite is the Coffee Break suite!

Here is my card:

My card is a case of one from the annual catalog.  I love that the catalog not only showcases our great products, but also gives us ideas on what to do with them!

Be sure to stop by the Stylin' Stampin' Inkspiration blog and see what the other design team members are sharing!

Have a great weekend.  Thanks for stopping by!
~Nichole

Monday, July 10, 2017

For the Kids

Hello everyone!  I hope you had a wonderful weekend!  Today, my son is off on his first mission trip.  He is off to serve at a big Christian music festival, and will be gone for a full week.

Today, over at Stylin' Stampin' Inkspiration we are all sharing ideas for kid's cards.  I knew right away when I sat down to make this card that I wanted to do something with the fun popsicles
.
Here's my card:

I used Tempting Turquoise, Real Red, Lemon Lime Twist, and Tangerine Tango to make my popsicles.  I used the Happy Birthday Thinlit twice; once in Real Red, and once in Basic Black.  I offset the black just a little so it shadows the words on the left.

That is all I have to share for today.  Stop by the SSInk blog to see what the other design team members have to share!

Thanks for stopping by!
~Nichole

Friday, July 7, 2017

SSINK - Case the DT Member - Cheryl Hamilton

Hello everyone!   

At Stylin' Stampin' Inkspiration we are starting a new feature.  On the first Friday of each month we will take turns CASE-ing one of our lovely design team members.  We are starting out with my friend, Cheryl Hamilton.


Cheryl was raised on Oahu and has lived on Maui for about 30 years.  She & her husband, Pat, have 2 daughters that are in their 20's.  Cheryl is a nurse who is happily working part time so that she can spend plenty of time with her favorite hobby...stampin'!

Be sure & visit Cheryl's blog:  www.createwithcheryl.me

I decided to CASE a card that Cheryl posted on May 29th.  I love this card because it is quick and easy, and I am always looking for more masculine card ideas.

Here is my card:

Wednesday, July 5, 2017

ICS Blog Hop - New In Colors

Hello everyone!  Welcome to the July Inspire, Create, & Share Blog Hop.  This month we are all sharing projects that feature the new In Colors.  Have you seen them yet?  I really love all five of the new colors.  
Here they are:

Which one is your favorite?  I thought Berry Burst was my favorite, but I think I use Lemon Lime Twist the most.

Here is the card I made for tonight's hop.  It features both Lemon Lime Twist, and Berry Burst.


I used the Bike Ride stamp set that I got for free at the April OnStage event.  I love that you can totally customize your bike because each piece is a separate stamp.  I also really love that this stamp set makes it super easy to color in your images.  See the flowers there on the back of my bike?  The outline of the flowers was one stamp ( stamped in Basic Black ), the flowers are a second stamp (stamped in Berry Burst), and the leaves are a third stamp (stamped in Lemon Lime Twist).

Next up on our hop is my good friend, Darla.  I know she'll have something great to share with you!  


Thanks so much for stopping by!
~Nichole 

Monday, July 3, 2017

#SSINKCC47

Hello everyone!

Today, over at Stylin' Stampin' Inkspiration we have a fun, summery color challenge going on.  Also, starting with this challenge we will now have new challenges on the first and third Monday of each month, which gives you more time to play with us!


Aren't those colors just so fun?!

Here's my card:

I am *in love* with the Wood Words stamp set.  I used the circle image to create my background.  I then stamped the rooster image in Melon Mambo on a Stitched Shape Oval, and added an Island Indigo greeting underneath.  I finished my card off with a Delicate Doily, two Pretty Label punches, and bow made from the Lemon Lime Twist Ombre ribbon.

Now it is your turn - head on over to Stylin' Stampin' Inkspiration and play along with us.  I can't wait to see what you come up with .

Thanks so much for stopping by!
Have a great day!
~Nichole