Showing posts with label treat holder. Show all posts

Sunday, October 15, 2017

Hello Fall Treats

Hello everyone!  Today I'm sharing a set of fun little fall treats.  I made a bunch of these for attendees of my team meeting on Saturday, and also for those who attended my classes today.


I first saw this kind of treat made on a Pampered Stamper video.  My treat holders feature products from the Holiday Catalog. I used the Painted Autumn Designer Series Paper for my cups.  This paper pack is one of the packs included on the Buy 3 Get 1 FREE sale going on right now.  I cut my sleeve, and lid out of Very Vanilla cardstock.  On the sleeve, I used some images from the Merry Cafe stamp set.  I love that we have a second stamp set that coordinates with the fun Coffee Cup Framelits Dies.  Each treat holder holds about 4 Hershey kisses, perfect for a little gift.

Here are all the packs of designer series paper that are on sale right now:


Thanks so much for stopping!
~Nichole


Thursday, October 5, 2017

12 Weeks of Christmas - #12

Hey everyone!  Today, I am starting a new series here on my blog.  We will be counting down the weeks until Christmas.  Each week I will feature a card, and another coordinating item.  Can you believe there are only a little over 12 weeks until Christmas?  I can't!


Here is this weeks project:


My projects feature some prodcuts from the Color Theory product suite in the annual catalog.  For my card, I started with a Dapper Denim card base.  I added some of the Dapper Denim & Whisper White crackled designer series paper from the Color Theory pack.  On the DSP, I used Dapper Denim and Pool Party inks to stamp some snowflakes from the Colorful Seasons stamp set.  I also cut out one of each snowflake from the Seasonal Layers thinlits, for more texture.  I love the look of the Silver 3/8" Metallic-Edge Ribbon on the side.  My greeting comes from the Labels to Love stamp set, and was punched out using the Everyday Label Punch.  Both of these items are from the holiday catalog.

My little treat box is a Clear Tiny Treat Box found on page 195 of the annual catalog.  I filled it with some Hershey kisses.  I liked that the silver wrapper of the candies, coordinated with the silver on the card ribbon.  I wrapped some of the same designer series paper as what is on the card, around the box.  A simple baker's twine wrap and bow, and a tag finishes of this quick treat.  The tag features the same Everyday Label Punch, this time paired with the Merry Little Labels stamp set stamped in Dapper Denim.  In the background, I have stamped some of the snowflakes from the Colorful Seasons stamp set, in Pool Party.

Thanks so much for stopping by!
~Nichole


Wednesday, February 1, 2017

SSInk 3-d Valentines

Hello everyone!  Happy Hump-Day.  We have made it halfway through the week - and the weekend is starting to come into view!

Today, over at Stylin' Stampin' Inkspiration we are sharing 3-D Valentine items.  I love making three-dimensional items, especially treat holders!  Who doesn't love a cute little pick me up?

Here is what I made:


This tiny little bag is made from a 3"x6" piece of Designer Series Paper.  I saw this on a YouTube video by Dawn on her channel - Dawn's Stamping Thoughts.


The bag holds 3-4 Hershey nuggets that I wrapped in coordinating designer series paper.  I decorated my bag with a red glimmer heart, and a greeting from the Ready to Pop stamp set.

What kinds of things do you do for Valentine's Day?  What is your favorite treat holder?

Thanks so much for stopping by!
~Nichole

Product List

Wednesday, October 23, 2013

25 Stamp Sets for 25% off! Featured set #2


Did you know Stampin' Up! is celebrating their 25th birthday on October 25th?  To celebrate - they are giving you a gift!  For a limited time, 25 of our exclusive stamp sets are on sale for - you guessed it - 25% off!!  How awesome is that?!?!!

This sale only lasts through October 28th, so don't delay!  
You can see the humongous list of stamps on sale here.

To help you see the many possibilities with the stamp sets on sale, I plan to show you two - three examples of each of the set.  I do not own them all, but I have great stampin' sisters, and together - we've got you covered!   I plan to show the sets in the order they are listed on the PDF.  Be sure to check back, and see all the cool ideas

Zoo Babies

Regular price: $27.95 W / $19.95 C
Sale Price: $20.96 W / $14.96 C


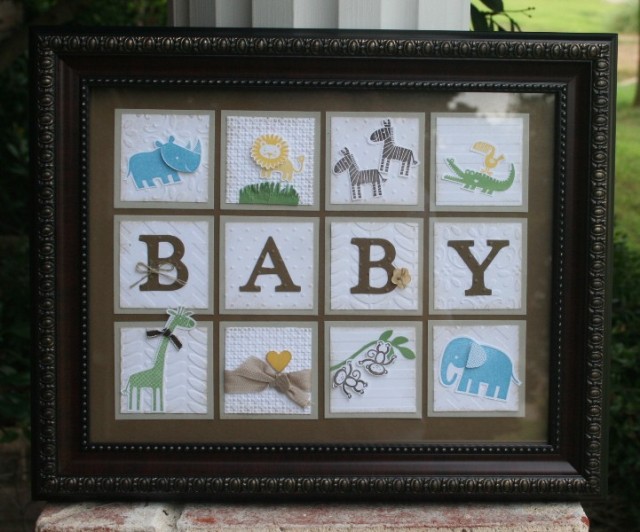
This beautiful frame would make an amazing baby gift!  It uses mostly gender neutral colors, and showcases all of the animals in the stamp set.  I think it'd make a lovely addition to any animal themed nursery.  This project was done by Dawn over at Perrywinkle Press.


Isn't this card just precious?!?!  I just love everything about this!  This card was made by Yapha, over at Rubber Stamping and Cardmaking with Yapha.


Oh. my. gosh!!  This adorable project brings a whole new level to my "neediness" of this stamp set!  How stinkin' cute is this little circus train?  These adorable little treat holders were made by Susan, over at Suestampfield.

So, that is what I have to share with you for Zoo Babies!  Be sure to check back soon, and see which stamp set is featured next!  As always, you can buy any of these stamp sets over at my store: Scrappy Stamps and Ink.  Thanks for stopping by!


Tuesday, October 1, 2013

Fall Blog Hop

Thanks for joining me for the Fall Blog Hop!  If you are coming here from Olivia's blog - thanks for continuing the hop!  If you are starting here, don't worry, you can click around through all of the participating blogs by using the "Next" button on the bottom of this post.


This month our hop is all about Fall, and Thanksgiving.  I love this time of year!  Everything is so colorful, and beautiful.  I love the cooler weather, and the chance to pull out my favorite sweaters and boots.  What is your favorite thing about this time of year?  For the blog hop this month, I have four different projects to share with you.  I have two cards, a treat holder, and a mini album.  I hope you enjoy them!


For this first card, I used the Wonderfall stamp set to create my own background paper.  The colors I used were inspired from my color coach.  These colors include Early Espresso, Marina Mist, Pumpkin Pie, and a little Soft Suede.  The greeting is from the Harvest Of Thanks stamp set.


This card is a bit simpler.  It showcases the Harvest of Thanks stamp set.  I love this set!  (& I love it even more because I earned it for free at convention!)  Are you wondering where my skinny burlap ribbon came from?  Well, it is the same 1 1/4" Burlap Ribbon offered in our Holiday Catalog.  I just cut it into thirds.


This little treat bag was so easy to make!  I just took a quarter sheet of cardstock, and scored it at 1 inch on the short sides, and 2 inches on the long sides.  For the handle, I cut the burlap ribbon in half, to make  a skinnier piece.  The leaf and the acorn are from the Autumn Accents die.  I embossed the leaf with the Pretty Print Textured Impressions Embossing Folder.  I cut out the bottom of the acorn with the Baked Brown Sugar DSP from the Paper Stacks.  The top is cut with the Champagne Glimmer Paper.


This is the cover for my Thankful for Family mini album.  This idea was shown on stage at convention, when Sara Douglas made a very similar album.  Just about everything needed to make this album is included in the Thankful Tablescape Simply Created Kit.  This kit was designed to give you an easy coordinated way to decorate your Thanksgiving table.  While I am sure that would look lovely, mini albums are a little more my style.  I knew right away that I wanted to make that album!  Even the chipboard for the covers comes from the kit!  The only thing I added to this album is a few sheets of cardstock.  I made my pages double pockets, and needed inserts for the back pockets, that is where most of the cardstock comes in.

Here are a couple pictures of the inside pages.

This is the front pocket of one of my pages.  The black rectangle on the bottom left is for holding a wallet sized photo.  I had planned on having one there, but they haven't come back yet.  Sorry!


This is one of the back pockets.  The intention of the double pocket is so that hopefully, my family members will write what they are thankful for on the sheet in the front pocket; and in the back pocket, we can all write why we are thankful for that person.

Well, that is all I have to share for today.  I hope you've enjoyed my projects!  Please continue on in the blog hop, and visit the other ladies too!  I know they will all have great projects to help inspire you this fall!  Pearl is up next! Thanks for stopping by!


Here is a list of all the blog hop participants. 

LIST OF PARTICIPANTS:
1. Stampin’ Grandma (Sherry) http://stampingrandma.blogspot.com/

2. The Flying Stamper (Deb) http://flyingstamper.blogspot.com/

3. Olivia Loves to Stamp (Olivia) http://oliviastamps.blogspot.com/

4. Scrappy Stamps and Ink (Nichole) www.scrappystampsandink.blogspot.com - You are here!

5. Stamping with Pearl (Pearl) www.stampingwithpearl.blogspot.com

6. Scrapper Frog’s (Cindy) http://scrapperfrogcindy.blogspot.com/

7. Crafty Tam (Tammy) www.tamsdigiworld.blogspot.com/

8. Too Cool Stamping (Angie) http://www.toocoolstamping.com/

9. Stamping Creations with Rachelle (Rachelle) http://www.stampinwithrachelle.blogspot.com/

10. Simple & Creative Corner (Tina) http://thesimpleandcreativecorner.blogspot.com/

11. Stampin with Darla and Sisters (Darla) http://stampinwithdarlaandsisters.blogspot.com/