Monday, June 27, 2016

Moroccan Nights Shadow Frame

Oh my goodness!  We've made it!  This is the last Monday in June!  Summer has officially started, and Relay is over for another year!

Relay was just as amazing as I had hoped.  There were ups, and downs, things that didn't go as planned, and forgotten things - but over all, the event was spectacular, and I was honored to be a part of it!


This week starts my Anniversary Week!  On Wednesday, I will celebrate 12 years with this amazing company!  I joined Stampin' Up! originally just to get my products at a discount.  I never would've thought that I would be able to say that stamping pays me to create!

To celebrate my anniversary - I'd like to give something back to you!  Yes, you - sitting there reading this.  You are the reason I have lasted 12 years in this, and you are the reason that my business is growing!  And to thank you for that - I am having an Anniversary Week Special.


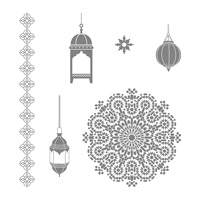
Today, I am sharing a 3-d project with you.  I made this Shadow Box Frame using some Kraft Cardstock, and the Moroccan Nights stamp set.  


This is the very first shadow box frame I have ever made.  It isn't perfect -but I love it!  I was able to decorate the sides, and top with the long border stamp from the stamp set.  

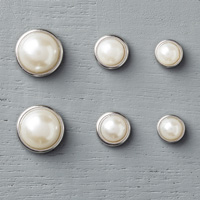
The centerpiece was made by stamping the medallion looking image four times onto vellum cardstock.  I then cut each one into a circle.  I folded the circle in half, twice to get these puffy quarter circles.  I covered my center with a petite petals punch, and a metal rimmed pearl.

That is all I have for today! 
Thanks so much for stopping by!
~Nichole


Friday, June 24, 2016

Sitting Here on the porch.

Hello there!  Welcome to Friday!  Are you ready for the weekend? I know I'm not ready.  Tomorrow is our Relay for Life of Puyallup Event, and I am so very excited.  But there are so many things to do at the last minute to prepare for the event, and then of course the things that everyone forgets about until right when you need them.

I am sure the event will be amazing, as it always is!


Today, I have a nice, relaxing card to share.  Mostly, because I would love to be right there, right now!  LOL!

This card was of course made with the Sitting Here stamp set.  I'm not sure if you can tell or not from this picture, but I used a layer of Fine Tip Glue on the flower pot to give it a glossy finish.  I did see a card like this somewhere, but I can not remember where.  So sorry!  Thanks for the inspiration if it was your card!

I really love this stamp set!  This, and the Swirly Bird stamp set were the first two "must have" stamp sets that caught my eye when I got the new catalog back in April while I was in Salt Lake City. #perksofbeingademo !!  Did you know that right now, if you join my Stampin' Up! team, not only do you get the best deal on your starter kit - you also get to choose 2 FREE STAMP SETS!  Any sets you want!! Total, with your free stamp sets that could be up to $229 in products, for only $99 plus tax.   You can message me for more info about joining my team, or check it out here: Join the Fun.  This promotion is only good until the end of June, so be sure to check it out today!


Thanks so much for stopping by!
~Nichole


Here is a list of products I used for this card:

Thursday, June 23, 2016

June D's Stamping Team USA Blog Hop - New Products

Welcome to another month of hopping with D's Stamping Team USA!  I am, as always, so very honored to be hopping with these lovely ladies!  This month our hop is focusing on products from the new catalog.  I bet you just came over here from Megan's blog.  Wasn't her project great?  She always has such wonderful ideas to share!!  I am featuring a project that I made for my "Color Your World" class a week or so ago.  This bag was made using the Gift Bag Punch Board.  I made my own "Designer Series Paper" using the Swirly Bird stamp set.  It is my absolute favorite new set out of the catalog!!  


For the bag, I started with a full sized 8.5" x 11" piece of Thick Whisper White cardstock and then stamped all over it.  When you are covering an area like this with stamping, it is helpful to start with the biggest stamps, and then work your way down to the smallest stamp you have.  For my bag topper, I cut out one of the new scalloped squares from the new Layering Squares Framelits.  I love those too!  I cut a long length of ribbon, and glued it to the outside/back of the bag under the scallop square.  This way, I was able to have a finished look, but still fill the bag with goodies quite easily when I'm ready to give it away.


Next up on the hop is Darla!  I am sure she'll have something super fun to share too! 


Thanks so much for stopping by!
~Nichole

Wednesday, June 22, 2016

Thinking of You Shaker Card

Hello!  How is the week treating you so far?  

Only 3 days until Relay for Life of Puyallup!  I am up to my eyeballs in things to do to finish getting ready for the event.  I love Relay, and all the love, joy, and support we are able to bring people through this event.  I am also so happy to be supporting the organization who gives the most for cancer research in the U.S. (after the American government).  As much as I love Relay, I would love even more for there to not be a need for events like this - for cancer to have a cure.  You can find out more about our Relay for Life event here: Relay for Life of Puyallup

Ok, enough relay talk - onto the stampin' I have to share with you today!

Today, I'm sharing a shaker card I made using the Pop of Paradise stamp set.  


Shaker cards are a whole lot easier now with our new Foam Adhesive Strips.  These lovely little gems of foam adhesive will curve/bend to any shape you need.  For this card, I did a heart.  

That is all I have for today!
Thanks so much for stopping by!
~Nichole


Here is a list of products I used to make my card:

Monday, June 20, 2016

A Little Expression of Love

Happy Monday!  (Well, happy wishes for as good as any Monday can be.  LOL)

Today I'm sharing a simple cards made with the Painter's Palette stamp set, and the coordinating 8x8 DSP stack.


For this card, I used a Blushing Bride card base, and then a small strip of Playful Palette Designer Series Paper.  The DSP is Blushing Bride with some colored speckles.  I love the fun artsy feel to this product suite.  You can see everything included in this suite on pages 118 & 119 of the Idea Book & Catalog.  If you haven't gotten your new catalog yet, send me a message and I'd be happy to get one to you!

Thanks so much for stopping by!
~Nichole


Here is a list of products I used on this card:

Friday, June 17, 2016

Painter's Palette Post-It Note

Hello everyone!  Welcome to Friday!  TGIF!

I am looking forward to the weekend.  Tomorrow I will gather with 15 other Stampin' Up! demonstrators for a shoebox swap.  On Sunday, my family is celebrating Father's Day by attending the Tacoma Rainiers game. 

From now until the end of June my posts will be pretty short and sweet.  I am the Co-Event Lead for the Relay for Life of Puyallup, and our event is coming up on the 25th.  I am super excited about it, and drowning in things to get done.  


Today, I am sharing a cute little post-it note holder I made using the new Painter's Palette stamp set.


This project is super simple, and would make a great, quick gift for someone.  You could pair it with a pen, and a card and be done with it.

Thanks so much for stopping by!  
I hope you  have a lovely weekend!
~Nichole